
Teensy DSP Series – Part I
This is the first installment of a series of posts that will revolve around Teensy and use it to get more comfortable with DSPs to create unique effects to play around with.
Introduction
When we say “Digital Signal Processing,” it can be a bit of a loaded topic. Not only are there tons of actual Digital Signal Processors (DSPs) out there to use, but the extent to which they’re used and their complexity is pretty daunting. You can have discrete DSPs in the form of specialized chips (e.g., the FV-1). You can look at things like Neural DSP Quad Cortex for a rather expansive example of what they could unlock (2 ARM chips and four specialized SHARC+ chips). For many folks, this is a bit out of reach; both in terms of cost and complexity (if we’re talking about the DIY stompbox world).
But let’s talk about something that seems to operate between the two DSPs mentioned above: Teensy by PJRC.
Getting Started With Teensy
The Teensy is more than just a DSP; it’s a pretty beefy microcontroller that can do many other things than digital signal processing. But in our case, we’re going to specifically cover the Teensy Audio Library that we can use to create all kinds of different effects that we would want, ranging from distortion to reverb. (Note: I’d encourage you to follow the links throughout these sections to understand these Teensy libraries better, as they would probably require an entire post.)
Quick Aside
Since many DIYers might have experience dropping things into a breadboard and making them work, they may not have the real estate on their breadboards to pin out everything the Teensy might require. Additionally, the teensy itself is more of a general solution, as opposed to a specific DSP. If you’re looking for something that’d be a bit more straightforward to integrate, I suggest checking out the BlackAddr Teensy Guitar Audio Shield MKII. It offers the standard connection ports you’d probably want when dealing with audio. 1/4 stereo jacks, MIDI jacks, additional audio codecs, and (with an upgrade) even physical controls like potentiometers. We won’t touch on this shield now, but look for it in future posts!
Installing the Legacy Arduino IDE
So, let’s say we have our Teensy in hand and connected to our computer via a USB mini data cable. First, we must ensure that we have the correct legacy version of the Arduino integrated development environment (IDE). At the time of writing, this version is 1.8.19. You’ll probably have to scroll down the download page linked previously to find this. For me, it looks like this:
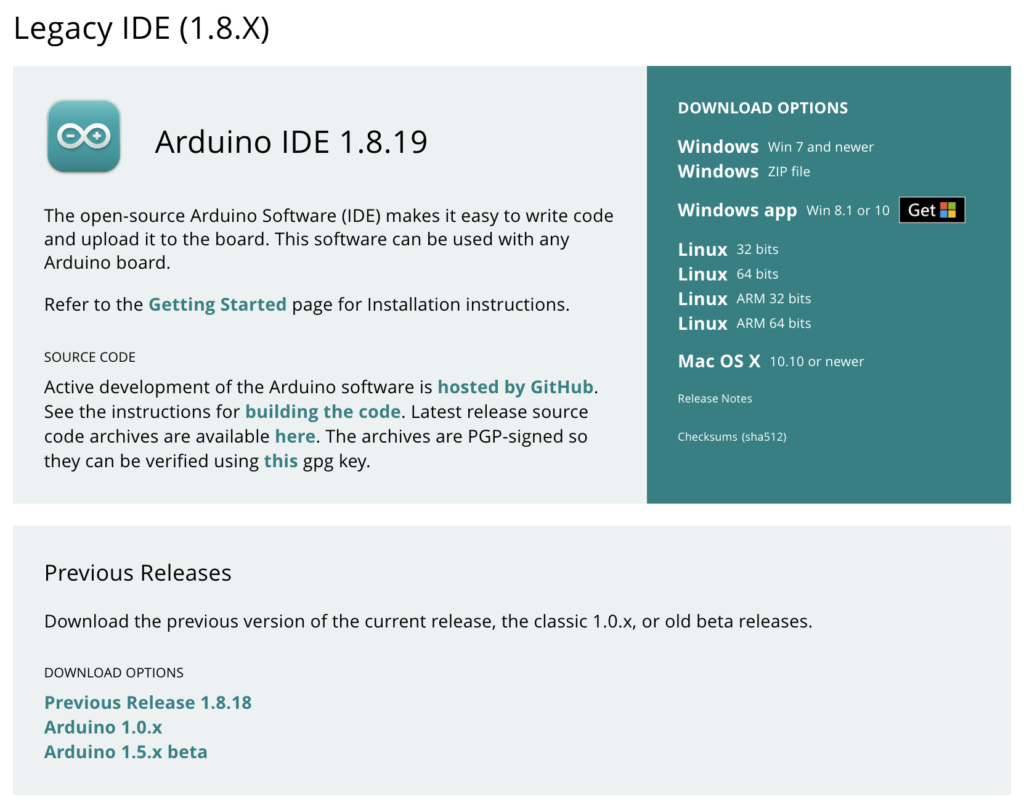
Be sure to open the Arduino IDE so that any required drivers to communicate via USB -> Serial will work!
Installing Teensyduino
With the legacy Arduino IDE installed, let’s install the Teensyduino IDE. Follow the instructions on the Teensy site, and you should be ready to go. This will be the IDE you use when updating the Teensy code (crazy, huh?). Once this is installed, go ahead and open it up.
A Note About Mac OS
I use Mac, so this was a harsh lesson I learned. When you start Teensyduino, you’re not done. There’s another program Teensyduino requires to flash applications to your Teensy called “Teensy.app”. It’s installed as part of the Teensyduino package. To get to this application, you’ll have to view the package contents of the Teensyduino.app. Do this by right-clicking Teensyduino.app, and you’ll see the “Show Package Contents.”

With the contents of the Teensduino.app open, you’ll want to click through the following to find the Teensy.app: Contents > Java > hardware > tools > Teensy.app

You’ll have to ensure that this application runs whenever you’re using Teensyduino to update your code; otherwise, it will fail.
Input and Output
A quick word about audio input and output for the Teensy: I use a BlackAddr Teensy Guitar Audio Shield MKII, fully loaded. You don’t have to use this shield; you can wire things up yourself or use other shields that might be out there. But it’s been fantastic to get started and ensure I have all the ports I need to plug things in and get going. We won’t cover the Guitar Audio Shield MKII in this post.
Assumptions Before Moving Forward
Since this is a big topic, we’re going to assume that you have a Teensy in hand and wired up (whether through a breadboard, directly, or a shield) with an input and output jack for plugging in your guitar to your audio output. We’ll also assume that you have a working USB Micro data cable. When getting started with Teensy, this is very important. Many USB Micro cables will be power only and won’t be able to transfer data between your computer and Teensy. If you’re having issues getting your Teensy connected, there’s a good chance that the cable is the culprit. The following sections require the ability to update code on the Teensy, hook up your guitar, and listen to the output from the Teensy. Check the “Getting Started With Teensy” section for more information on how to get started.
Teensy DSP
Now, let’s make this baby sing!
Loading Our First Sketch
Now that we’re all set up let’s get this party started! Let’s get started by seeing how our Teensy processes signal from our guitar. With that said, open a new project in Teensyduino (name it whatever you like, I’m going to call it “signal_plotter”) and paste the below code. This will give us insight into our guitar’s real-time (or as close as we can get) signal. You’ll also get to hear the sound through Teensy to your amp!
/*
 * Copyright 2022 Straight to Ground LLC
 * Permission is hereby granted, free of charge, to any person obtaining a copy of this software and associated documentation files (the "Software"), to deal in the Software without restriction, including without limitation the rights to use, copy, modify, merge, publish, distribute, sublicense, and/or sell copies of the Software, and to permit persons to whom the Software is furnished to do so, subject to the following conditions:
 *
 * The above copyright notice and this permission notice shall be included in all copies or substantial portions of the Software.
 *
 * THE SOFTWARE IS PROVIDED "AS IS", WITHOUT WARRANTY OF ANY KIND, EXPRESS OR IMPLIED, INCLUDING BUT NOT LIMITED TO THE WARRANTIES OF MERCHANTABILITY, FITNESS FOR A PARTICULAR PURPOSE AND NONINFRINGEMENT. IN NO EVENT SHALL THE AUTHORS OR COPYRIGHT HOLDERS BE LIABLE FOR ANY CLAIM, DAMAGES OR OTHER LIABILITY, WHETHER IN AN ACTION OF CONTRACT, TORT OR OTHERWISE, ARISING FROM, OUT OF OR IN CONNECTION WITH THE SOFTWARE OR THE USE OR OTHER DEALINGS IN THE SOFTWARE.
**/

// Shout out to h4yn0nnym0u5e at the pjrc forum for the inspiration/code bits
// https://forum.pjrc.com/threads/69900-Non-realtime-audio-debugging

#include <Audio.h>
// Not needed if you're not using the BlackAddr audio shield
#include "BALibrary.h"

AudioInputI2S            i2s1;
AudioMixer4              mixer4;
AudioRecordQueue         queue1;
AudioRecordQueue         queue2;
AudioOutputI2S           i2s2;
AudioConnection          patchCord1(i2s1, 0, queue1, 0);
AudioConnection          patchCord2(i2s1, 0, mixer4, 0);
AudioConnection          patchCord4(i2s1, 1, mixer4, 1);
AudioConnection          patchCord5(mixer4, queue2);
AudioConnection          patchCord6(mixer4, 0, i2s2, 0);
AudioConnection          patchCord7(mixer4, 0, i2s2, 1);

// Change this to whatever codec your shield uses
BALibrary::BAAudioControlWM8731 codecControl;

static int graphingDelay = 0;

#define COUNT_OF(x) ((int32_t)(sizeof x / sizeof x[0]))
AudioRecordQueue* queues[] = {&queue1,&queue2};
int16_t* dptrs[COUNT_OF(queues)];

bool outputEnabled = true;
void processQueues(void)
{
  for (int i=0;i<COUNT_OF(queues);i++)
    dptrs[i] = queues[i]->readBuffer();

  // actual processing:
  if (outputEnabled)
  {
    for (int j=0;j<AUDIO_BLOCK_SAMPLES;j++)
    {
      for (int i=0;i<COUNT_OF(queues);i++)
        Serial.printf("%d ",dptrs[i][j]);
      Serial.println();
      delay(graphingDelay);
    }
  }

  for (int i=0;i<COUNT_OF(queues);i++)
    queues[i]->freeBuffer();
}

void setup()
{
  AudioNoInterrupts(); // freeze the audio system

  // wait for serial connection to be established
  Serial.begin(115200);
  while (!Serial)
    ;

  AudioMemory(64);
  codecControl.disable();
  delay(100);
  codecControl.enable();
  delay(100);

  for (int i=0;i<COUNT_OF(queues);i++)
    queues[i]->begin();

  // output graph legend
  Serial.println("wave1 mixed");

}


int next;
void loop()
{

  if (queue1.available()) // assume if there's data for queue1, there's data for all
  {
    AudioNoInterrupts();
    processQueues();
    next = 250;
  }
  else
    AudioInterrupts();

  if (Serial.available())
  {
    while (Serial.available())
      Serial.read();

    outputEnabled = !outputEnabled;
  }

  // output dots if something's not working
  delay(1);
  if (--next < 0)
  {
    next = 250;
    Serial.print('.');
  }
}
Note: Be sure to read the comments and change the appropriate code where necessary so it will work with your audio shield! With this code in your project’s main file, click the “Upload” button at the top of the window (the right-facing arrow). This will make Teensyduino compile the code you pasted and upload it to your Teensy. If you have issues uploading, make sure that you’ve selected the correct USB serial port from the Tools > Port menu.
Seeing Our Signal
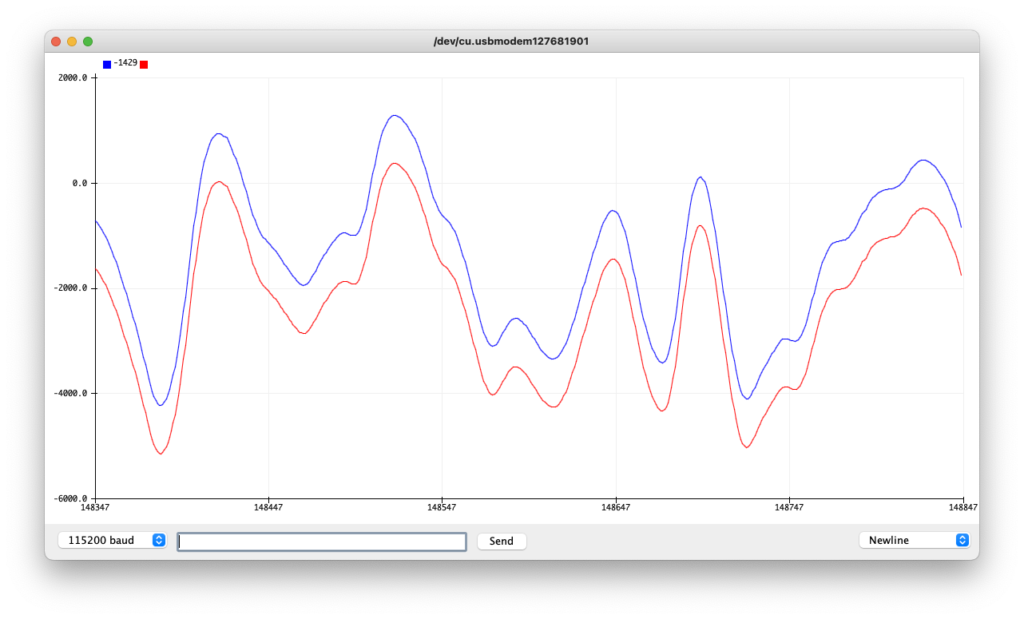
Your Teensy is now ready to show you the signal that it’s processing! Make sure your guitar is hooked up, your Teensy is connected to your computer, and Teensyduino is running. This code outputs data to the serial plotter that Teensyduino has built-in. Open this plotter by clicking the “Tools > Serial Plotter” menu item. You’ll get a window that streams the signal patterns from your instrument to the window. These are the signals that you’re generating when playing that you’re hearing!
What’s Next?
Congrats, you can now see how the signal from your guitar is processed through a DSP! With this knowledge, you can do all kinds of things. You could play with more effects in the Teensy Audio libraries to see how they affect that signal. Or you could implement some clipping to see how various clipping can affect the overall waveform of your signal. The possibilities are endless! But this post should at least give you confidence that you have a DSP that you can play with, understand, and use to grow into your custom software-driven pedal.
We’ll continue this series to show you how you could leverage Teensy to do even more incredible effects and see how they affect the sound and profile of the signals you’re seeing from your DSP, so be sure to check back!
Give Us A Follow!
We love seeing what readers manage to accomplish with what they learn. Also, we like to learn from what you all can do! Give us a follow on our socials to see what we’re up to, share what you’re working on, and spread the love.
Hi Randall, looks like a great start to an interesting series! I love seeing the community work to break down barriers and get enthusiasts into playing with their own DSP audio effects!
Appreciate it! Keep up the great work on the audio shields! It’s made getting started much easier.